
 Apex EDI’s Optometry Claims Processing Software Is Simple & Efficient
The Apex EDI Claim connector only appears in the USA version of Filopto. The Apex connector will automatically send identified claims, perform an auto-scrubbing of submitted claims and post payments made on a claim. The Apex connector will also provide a status of claims submission with logs of all transactions.
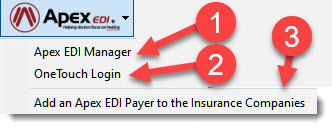
The Apex EDI Claim connector button provides quick access to various functions available with the Apex EDI connector. The button appears at several places in Filopto.


Depending where you access the Apex EDI Claim button different options may be displayed.
Step 1) Activating the Apex EDI Claim Connector.
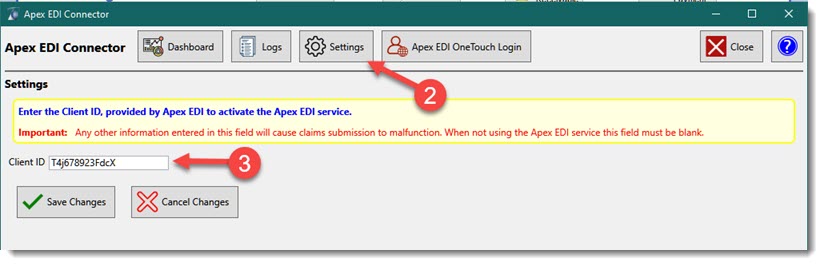
To activate the Apex EDI Claim Connector you must first register with the Apex EDI clearinghouse service (https://www.apexedi.com, Telephone Sales: (801) 383-0388). Once you have an account with Apex EDI you will be provided with a Client ID. The Client ID must be entered in the Apex EDI Manager (1). Open the Apex EDI Manager (1) and select the Settings (2) button. Enter your Client ID in the filed called Client ID (3). Click on the Save button to save your ID. You can then exit the Apex EDI Manager.
APEX Contact Information:
WEB Site: https://www.apexedi.com/
Telephone:
Sales: 1-801-383-0388
Support: 1-800-840-9152
Payer List: https://www.apexedi.com/support/payer-lists/ ( over 3,100 entries)
Apex User-Guide: https://www.apexedi.com/support/user-guide/
One-touch Login: https://onetouch.apexedi.com/secure/Login.aspx
Step 2) Link or Select the Insurance Companies for which Apex is to process claims.
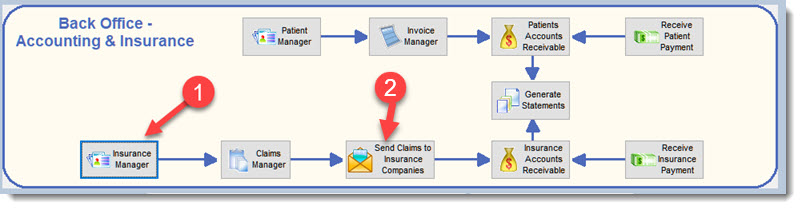
Open the Filopto Insurance Manager (1)
Option # 1 New Insurance Company
Select the Apex EDI button
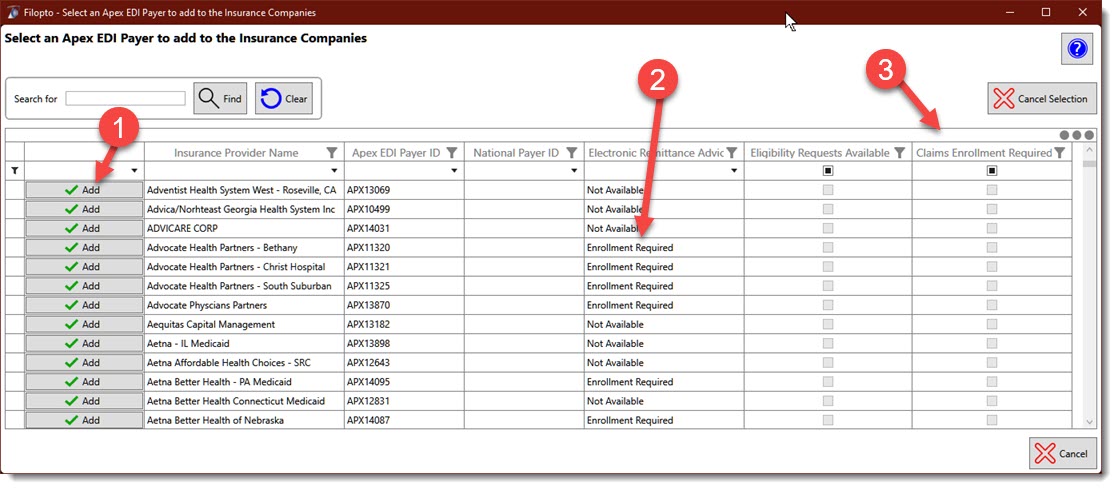
Choose the option Add an Apex EDI payer to the Insurance Companies (3) from the Apex EDI button. Apex Payer List covers over 3,100 insurances. Click on the Add (1) button to select the Insurance company from the Payer List. This action will link your insurance companies contained in the Filopto Insurance Manager with the processing codes (Insurance Provider Name, Apex Payer ID, National Payor ID) used by Apex for processing claims for the selected insurance company. Once the Insurance company profile is created with the Apex information complete the profile information and activate the profile (see Create New Insurance Company Profile).
IMPORTANT:
1) Some insurance companies require you to enroll to be able to submit claims. If enrollment is required it is displayed in the last column (3) of the Filopto Apex EDI Payer screen
2) Many Insurance companies provide an Electronic Remittance Advice (ERA) that Filopto can use to automatically apply payments against a claim. However you must enroll to be able to receive the electronic remittance advice. The Insurance companies offering this service is displayed in the Apex payer list (2).
3) If the insurance company supports Eligibility Request, you can via the Apex one-touch login option verify eligibility.
|
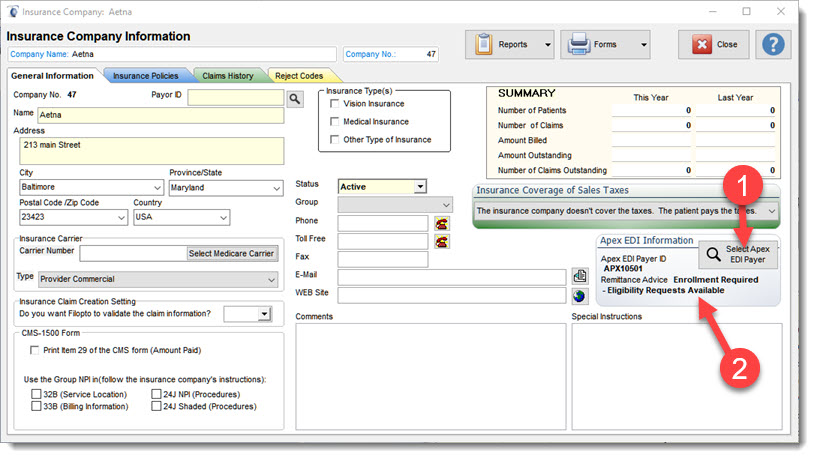
Option # 2 Existing Insurance Company
If you already have created an insurance company, you can link it with Apex by using the Apex link (Select Apex EDI payer (1) button) inside the Insurance company profile.
The Insurance company profile also display the Apex services (2) available with the selected company. For example; Apex will display a text if the insurance company profile screen if the insurance company requires enrollment to receive Electronic Remittance Advice, supports Eligibility Requests, or if the insurance company requires Claim Enrollment to be able to submit claims. If the insurance company supports Eligibility Request you can access the request form via the Apex one-touch login connection to verify eligibility.
Step 3) Submit your Claims for processing
The end user must select which claims to send from the Send Claims to Insurance Companies button (2) in the Back Office tab. Once the claims are identified as ready to be sent using the Apex EDI selector, the claims will be automatically sent to Apex for processing. Apex will do a claims scrubbing for accuracy purposes and if your claim passes, it will be sent for payment. Once the insurance company has responded, paid or rejected the claim request, Apex will forward to Filopto a status of the claim request. The Status will be displayed in the Apex EDI Manager log option. If a payment has been made the payment will be automatically posted to the claim account.
IMPORTANT:
Only claims linked to Apex (step 2) will be sent to Apex for processing. Non-linked insurance companies will not be sent.
|
Other features of the Apex Manager / Service
1) the Apex EDI connector will automatically record for you all payments made on a claim, eliminating the need for you to create entries for payment in Filopto. This is a big time saver. (ERA 835 Transactions (EOB))
2) The Apex EDI Manager provides a Dashboard that gives the end user an overview of the current status of claims
3) The Apex EDI Manager provides a log of all submitted claims and payments received.
4) The Apex EDI Manager can verify patient eligibility benefits in real-time (270/271) for the Insurance companies that support the function.
Apex Manager
The Apex Manager provides various view functions to assist in Managing Claims sent to Apex.
 Dashboard button
 Logs button
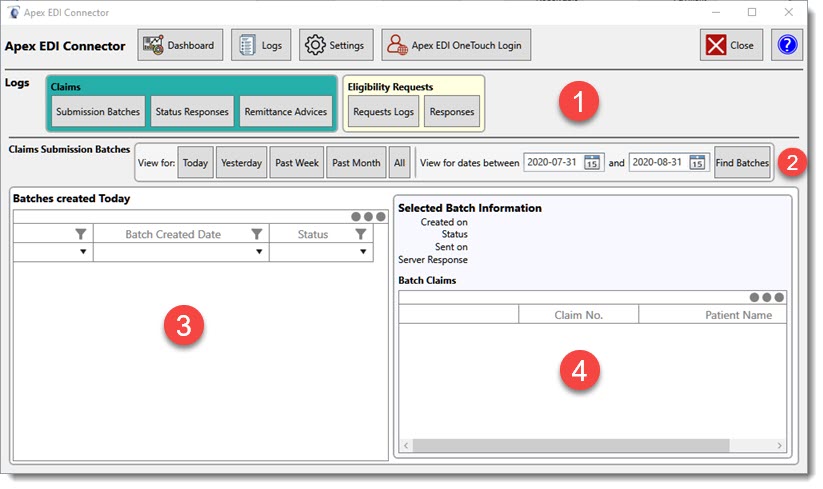
The Logs button displays the available logs of activities and transactions done with Apex. The screen is divided in several sections:
1) This section contains buttons that displays the various logs recorded. By selecting the button you wish to view, it will display the associated logs. The Available logs are for Claims submissions, Claims Status and Remittance Advices. Logs are also available for Eligibitility request and responses.
2) depending on the logs being displayed the second section permits users to only display the information for a given period of time.
3) If multiple logs exist for the selected period they will be displayed in the screen third section
4) The details of the log selected in section 3 of the screen will be displayed in section 4.
 Settings
To activate the Apex EDI Claim Connector you must first register with the Apex EDI clearinghouse service (https://www.apexedi.com, Telephone Sales: (801) 383-0388). Once you have an account with Apex EDI you will be provided with a Client ID. The Client ID must be entered in the Apex EDI Manager (1). Open the Apex EDI Manager (1) and select the Settings (2) button. Enter your Client ID in the filed called Client ID (3). Click on the Save button to save your ID. You can then exit the Apex EDI Manager.
 Apex EDI One Touch Logon
Web Link to the Apex One Touch Service
