
To create an new invoice, select the New Invoice  button on the Front Office tab which will guide you in creating an invoice.
Step 1: You will be requested to select the Patient for which you will be creating the invoice. If a Patient is already identified this step is skipped (for example, using the Patient Activity link on the Front Office screen).

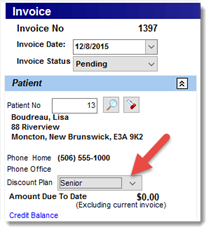
Step 2: The Invoice screen is displayed with the patient information entered in the Invoice Header section. Review the Patient and Insurance policy information and make the necessary adjustments.
The left section of the invoice screen (Invoice Header section) contains the Patient accounting information and Insurance information of the Invoice.
|
|

The Patient section contains the information related to the patient who received the services being billed. From this section a user can enter a Patient No. and retrieve his information by clicking on the  button. or select the
  button to search for a patient.
The Discount Plan field will display any default discount plan a user has listed in his patient file. The Discount plan can also be selected by the user from the drop down. Discount plans can be created in the Inventory Promotional Pricing Rule section.
The Bill To/ Guarantor section contains the information for the guarantor (Bill To) of the invoice. If you make a change to a guarantor information after the invoice is created you can update the invoice information of the guarantor by selecting the Update Guarantor button.
The Invoice Message permits messages to be attached to the Invoice.
Patient Insurance Information: contains the Insurance policies that are active in the patient file. If no insurance policy has been selected in the patient file this section will be blank.
The Insurance section will display the Patient default insurance policies on record for the patient. In the above example the patient only has one default policy in his patient file. If he had multiple (default) policies registered the section would be automatically adjusted to display the polices such as shown below.

Note that the Claims button all show (0) for the number of claims created using the insurance policy shown. The user can change the default insurance policies for a patient by selecting the drop down beside the appropriate insurance section. Once a claim is created, the insurance policy for that selection cannot be changed. To change a policy once a claim has been created the claim must be first voided and then a new insurance policy can be selected.

The Office section contains the information needed for accounting purposes and insurance claim processing such as the name of the office, department (if applicable), Place of Service, Referring Physician and Place of Service Code. Most of these fields are automatically completed if the information is provided in Filopto default settings. Complete all pertinent information since it is used in the creation of the insurance claim. Missing information may cause claims errors.
Referring Physicians information can be directly entered or selected by clicking on the Referring Physician button.

The second  button displays the information related to the selected referring physician
The X icon removes the referring physician information from the invoice..
The Accident Info. button displays the information required to complete the insurance claim related to an accident. This information must be entered before creating the insurance claim.

To close the drop down, click anywhere outside drop down or click the accident button again.
Step 3: You can add items by 1) use the Bar Code field for entering items or 2) select them from the available buttons.
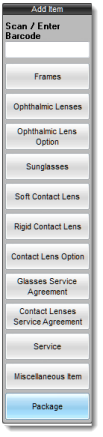
If you choose to select items from the Inventory and once you have finished selecting items you can then use the Bar Code field for entering other items. You can also do the reverse and first enter your Bar Code items and then use the Entry Row to add additional items.
To enter a line item to the invoice, click on the appropriate button for the line item type in the ADD Item list
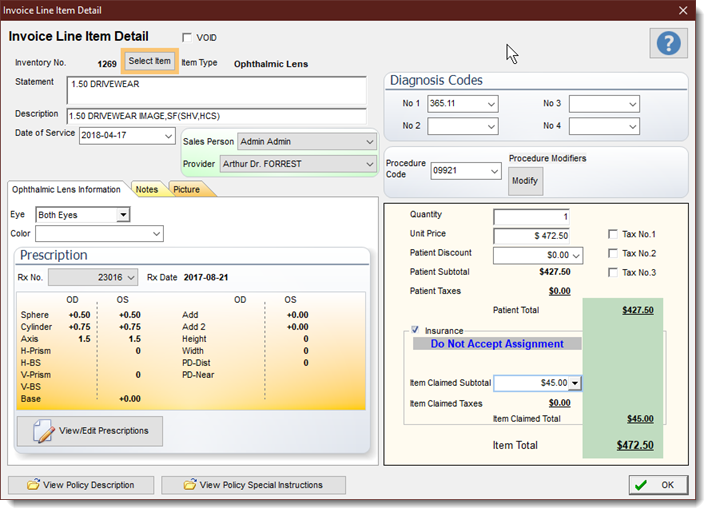
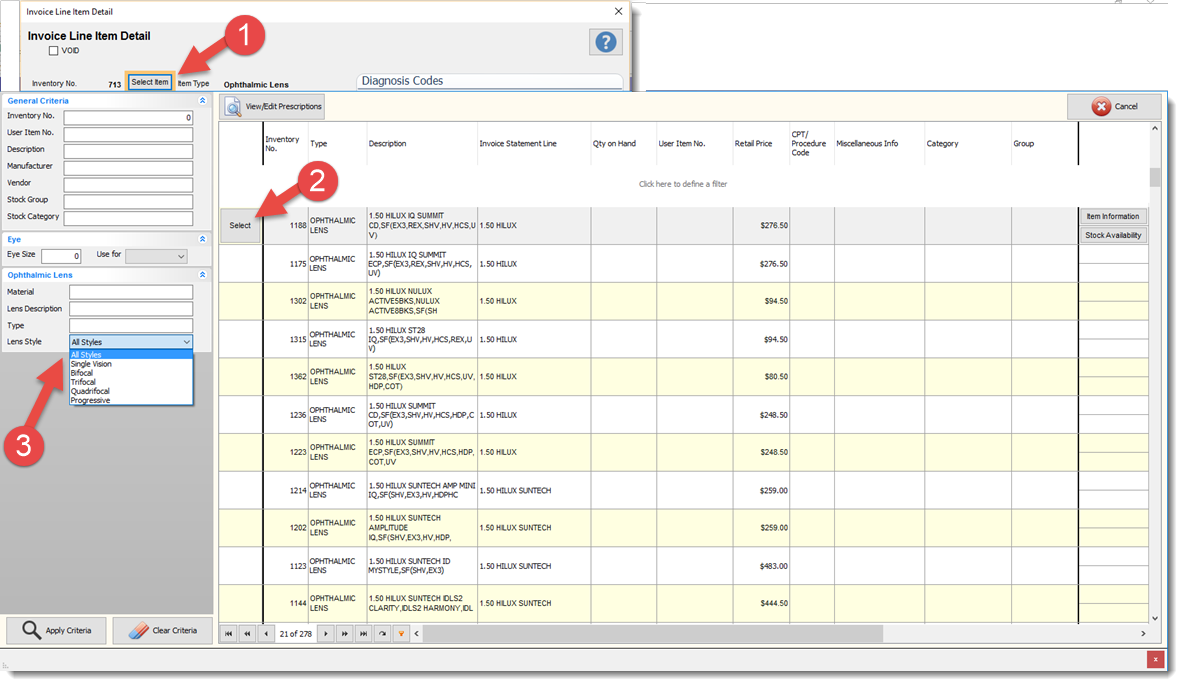
1) Select the Inventory Item using the the Select Item.button (1) located in the Invoice Line Item Detail screen.
2) Select or enter the Inventory No. The inventory drop down button displays a search screen based on the Item type previously selected. Once you have located the item, double click the item to add it as a line item (2). If you are doing a manual invoice this step can be omitted.
In the example below, for an optical lens, you can search for the lens, based on the lens style (3) as defined in the inventory screen for the item.
3) Enter the Quantity if more than one. Filopto enters a quantity of one by default.
4) If you are entering a manual invoice enter the Statement, Description and Unit Price for the item. If the item is selected from the inventory this information is automatically entered.
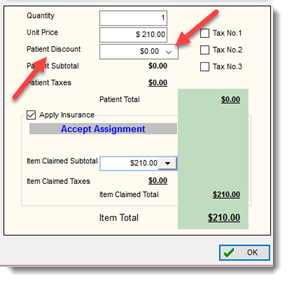
5) The line Item screen permits users to manually apply tax rates, enter ICD9 and CPT codes (required for insurance claims) and divide the charges between the patient and a insurance claim. Filopto can automatically calculate the portion to be paid by the Patient and Insurance company as well as make accounting (write off) adjustments for the claim (see Insurance Companies and Insurance policies for more details).
By selecting the Apply Insurance check box the user activates the Artificial Intelligence Insurance engine which will calculate based on the entered insurance policy rules, the amount the Insurance company will pay. If no rules are entered into the insurance Policy Rules, the user can manually enter or override the Insurance amount due in the Insurance Subtotal field.
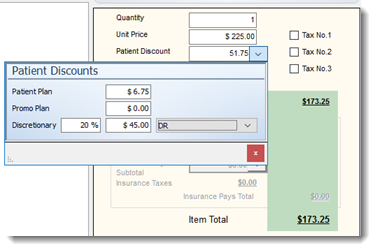
6) If you wish to provide a patient discount for the line Item, click on the Discounts column and enter the appropriate information. Three types of discounts are possible for each line item; 1) Patient Plan, 2) Promo Plans, or 3) Discretionary. The Discretionary field identifies the initials of the person who authorized the discount.
To create a discount for the complete Invoice, consider these two options:
1) creating a miscellaneous Item and using this item to apply a total invoice discount.
2) use the Discount Plan option located to the left of the invoice screen.
Step 4: Record any Payment made by the Patient using the  button on the Invoice screen.
Step 5: Create the Claim for this invoice by selecting the Claim button.
To create a claim select the appropriate Claim button and a drop down containing the claim information will be displayed.

The Prepare / Update button will create or update an existing claim. Once a claim is create it will appear in the grid below the Prepare / Update button. You can view/edit the claim by double -clicking on the claim record in the grid.
WEB Base Claim submission
If you entered in the Insurance company profile a web site a Go To WEB Site button is displayed permitting the user to enter if appropriate the claim via the insurance web interface or consult the insurance web site for information (see Insurance Companies and Plans).
|
If some patient information is missing a Message Dialogue box will appear identifying the items that are missing to properly create a claim. Enter any missing information and then try again the claim button and create the claim. The claim information looks in the Patient, Employee, System Settings and Insurance Company File for the information required. If you enter the data required in these files prior to creating the invoice no missing information warnings will appear.
If you try to close an invoice and all required information has not been completed a warning screens will appear prompting you to complete the items that are missing.
Following are example of some of the screens you may encounter. You will notice that you can always continue without entering the required information. However please note that the some required invoice or claim information may be missing which may need to be entered later, causing you to re-open and finish the invoice and/or claim process properly.


